
Product verification
How to Verify a Video Editor Without a Forced Watermark
Verify that FreeCut 1.3 exports without a forced watermark: a ten-minute test with timeline setup, export panel steps and calculated file-size checks.
No watermark is one of the most advertised and least tested claims in app store listings. The public description of FreeCut 1.3 states that exports do not receive a forced FreeCut watermark. This article turns that sentence into a test you can run in about ten minutes: a controlled test project, a concrete walk through the export panel, and a short calculation to sanity-check the file size. At the end you know whether a mark shows up and where it came from.
Three places a mark can come from
If a logo shows up in a finished video, there are exactly three candidates. First, the source footage: a clip that has already passed through another app may carry that app's branding baked into the pixels. Second, your own project: a forgotten image or text layer on the timeline renders correctly into the export and then looks exactly like an editor stamp. Third, the editor itself, adding a mark during rendering. Only the third case contradicts the no-watermark promise, and the procedure below separates all three cleanly.
The test project: one source, one track
Pick a short clip you recorded yourself that has never passed through another editor. Twenty to thirty seconds with both bright and dark areas is ideal, because a translucent mark stands out differently against a white wall than inside a shadow.
- 01Import the clip into FreeCut from Photos. Import from Files, iCloud or the camera works the same way; one source is enough.
- 02Place the clip on an otherwise empty timeline. There should be exactly one video track and no image, text or additional audio track.
- 03Check the track headers at the edge of the timeline. Every track has an eye toggle for visibility and a speaker toggle for audio. If only one track with an active eye exists, no hidden layer can render into the export.
- 04Play the preview once from start to finish and watch all four corners. Anything visible here comes from the source, not from the export.
- 05Write down the app version. A test result always applies to the version you checked, never to every future update.
Through the export panel, step by step
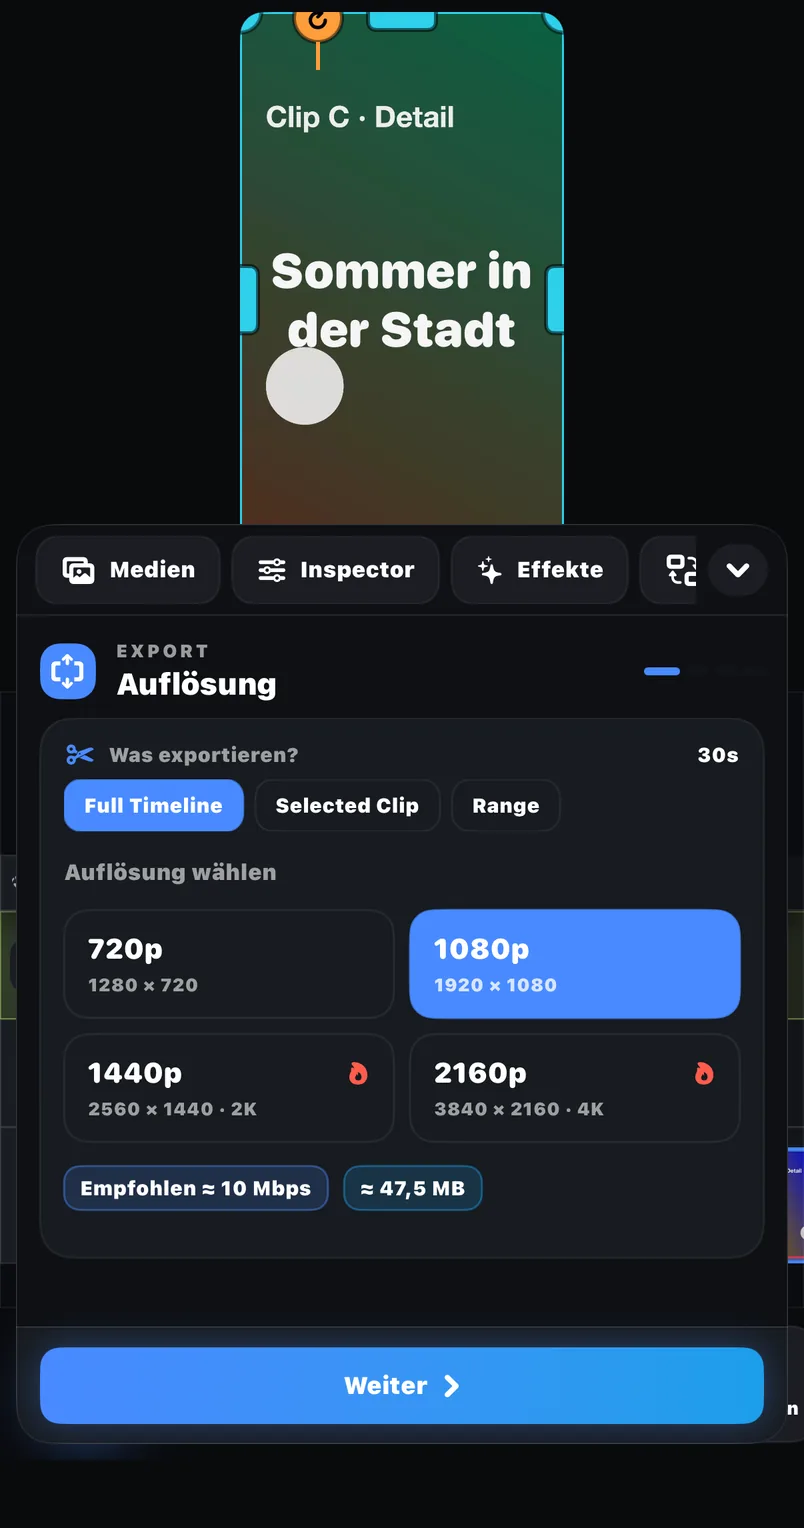
FreeCut 1.3 documents three export scopes: the full timeline, a selected clip, or a marked range. The range is ideal for this test, because it exports just ten seconds of detailed footage that you can inspect frame by frame.
- 01Mark a range of roughly ten seconds in which all four corners show visible detail.
- 02In the export panel, choose the range scope instead of the full timeline.
- 03Set the frame rate to match your recording, usually 30 or 60 fps, and pick a bitrate that fits the resolution, around 6 Mbps for 1080p material.
- 04Read the estimated file size the panel shows alongside FPS, bitrate and codec, and write it down. At ten seconds and roughly 6 Mbps the estimate lands around 8 MB.
- 05Save the export straight to Photos or Files, and do not pass it through a messenger or another app before reviewing it.
Cross-checking the file size
You can verify the size estimate yourself. The rule of thumb: video bitrate = width x height x frame rate x bits per pixel, and file size = (video bitrate + 192 kbps audio) x duration / 8. Using 0.10 bits per pixel as a common reference value, 1080 x 1920 at 30 fps works out to roughly 6.2 Mbps, so a 60-second clip lands at about 48 MB. Every value in the table is calculated with this formula, not measured.
| 720 x 1280, 30 fps | approx. 2.8 Mbps; 60 s is approx. 22 MB (calculated) |
| 1080 x 1920, 30 fps | approx. 6.2 Mbps; 60 s is approx. 48 MB (calculated) |
| 1080 x 1920, 60 fps | approx. 12.4 Mbps; 60 s is approx. 94 MB (calculated) |
| 10 s test range, 1080 x 1920, 30 fps | approx. 8 MB (calculated) |
Inspect the saved file, not the preview
Open the export outside FreeCut, for example in Photos, and play it full-screen. A forced watermark typically sits permanently in one corner or appears as an outro at the very end, so those places deserve the closest look.
- All four corners checked at three or more paused positions.
- First and last second reviewed frame by frame, since intro and outro stamps hide there.
- Bright and dark areas compared, because a translucent mark is clearly visible on only one of the two.
- The same positions cross-checked in the original clip.
- Actual file size compared against the estimate you wrote down.
Common misdiagnoses and how to resolve them
- A logo is visible in the export but also in the original: the branding lives in the source footage. Not an editor defect, but also nothing any export setting can remove.
- An element appears in the export that you never noticed in the preview: check the track headers. Toggle each track's eye off and on and a forgotten image or text layer reveals itself in seconds. Delete it and export again.
- The file is suddenly much smaller after sending it, for example 10 MB instead of 48 MB: a messenger or cloud service recompressed it. Always judge the file straight from Photos or Files, never the received copy.
- The estimated size does not match the saved file at all: in most cases the full timeline was exported instead of the marked range. Check the scope in the export panel and repeat the test.
What a fair result actually says
If the test export contains no FreeCut branding, you have confirmed the public claim for the version you tested, your workflow and your device. A serious test claims no more than that: it proves nothing about future builds or third-party sharing paths. One pricing note: the absence of a watermark is not a Pro benefit you have to buy. According to the public listing, Pro removes ads, as a subscription through your Apple ID at 3.99 euros per month or 39.99 euros per year, and the export stays unstamped on both plans.
A promise anyone can verify in ten minutes is worth more than any marketing page.
Sources and review basis
Product version: FreeCut 1.3Reviewed on 2026-07-20
About the editorial team
The FreeCut editorial team is part of LKS E-Commerce GmbH in Wuppertal — the same team that builds FreeCut. Every guide is reproduced in the app, product claims are limited to the public App Store listing, and every page carries a review date.
Keep reading
Instagram Reels Export: A Placement-Aware Review Process
Concrete Reels export walkthrough in FreeCut 1.3: FPS, bitrate, codec, calculated file sizes, a range test and common failure fixes, without preset myths.
A Source-First TikTok Export Checklist
A worked TikTok export example for FreeCut 1.3: source checks, a calculated bitrate and file-size table, and a step-by-step walk through the export panel.
Shorts, Reels and TikTok: One Master, Three Current Checks
Build one clean vertical master in FreeCut, then adapt it for Shorts, Reels and TikTok: concrete steps, calculated file sizes and fixes for common failures.
Cut your next video in FreeCut.
Export the selected scope without a forced FreeCut watermark, then inspect the saved file before publishing.