
Export · TikTok
A Source-First TikTok Export Checklist
A worked TikTok export example for FreeCut 1.3: source checks, a calculated bitrate and file-size table, and a step-by-step walk through the export panel.
TikTok transcodes every upload after it leaves the editor. Two facts therefore stay important: the platform controls the final compression, and its published requirements can change. Instead of a supposedly secret algorithm bitrate, this article walks through a verifiable workflow built around one concrete example: a 60 second clip at 1080 x 1920, calculated file sizes, and the places in FreeCut where you make each decision yourself.
Check the source before you touch the export panel
Before changing anything in the export panel, answer three questions about the recording. Was it actually shot vertically, or only planned that way? What frame rate did the camera record? And does the footage contain fine detail such as water, confetti or fast pans that demand extra bitrate? An export cannot invent information: exporting a 30 fps recording at 60 fps doubles the frames and the file size, not the smoothness.
- Source recorded at 30 fps: export at 30 fps. A higher value makes the file larger, not smoother.
- Source recorded at 60 fps with real motion, such as sport or camera moves: keep 60 fps.
- Mixed sources on the timeline: follow the most important, most motion-heavy clip.
- A calm talking-head recording: 30 fps is almost always enough and saves roughly half the video data.
A worked example: 60 seconds of vertical video
How much bitrate does a 1080 x 1920 clip need? A transparent rule of thumb uses bits per pixel, short bpp: bitrate = width x height x frame rate x bpp. Around 0.07 bpp is enough for calm, compression-friendly footage, 0.10 bpp is a solid middle value, and 0.15 bpp adds headroom for fine detail. The file size follows from that: file size = (video bitrate + 192 kbps audio) x duration / 8.
The following table is calculated with exactly this formula. It gives you an order of magnitude, not a measured test series.
| 1080 x 1920, 30 fps, 0.07 bpp | about 4.4 Mbps; a 60 s clip comes to about 34 MB (calculated) |
| 1080 x 1920, 30 fps, 0.10 bpp | about 6.2 Mbps; a 60 s clip comes to about 48 MB (calculated) |
| 1080 x 1920, 30 fps, 0.15 bpp | about 9.3 Mbps; a 60 s clip comes to about 71 MB (calculated) |
| 1080 x 1920, 60 fps, 0.10 bpp | about 12.4 Mbps; a 60 s clip comes to about 95 MB (calculated) |
Step by step through the FreeCut export
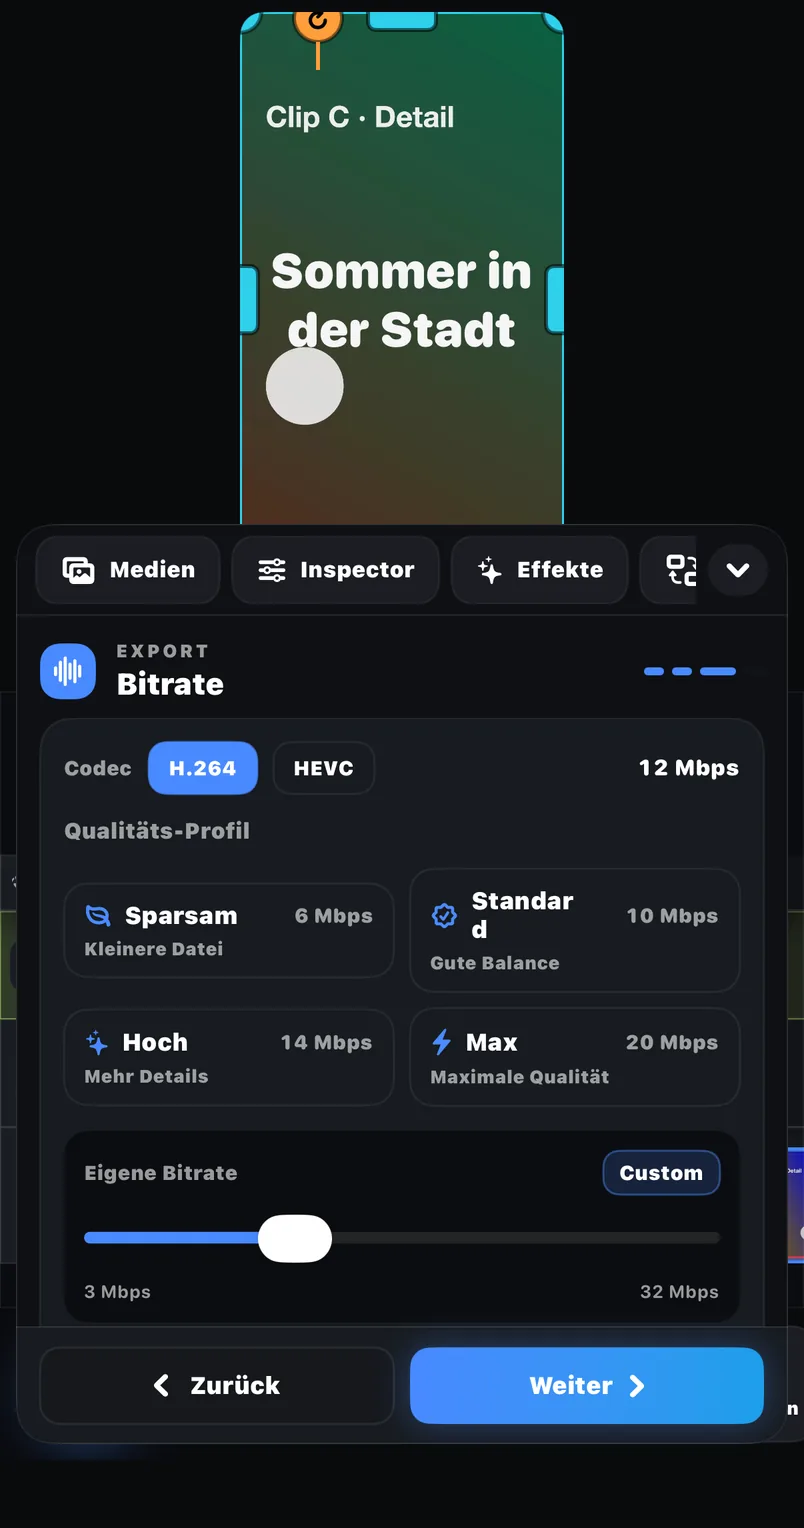
FreeCut 1.3 publicly documents control over FPS, bitrate and codec, an estimated file-size readout, and export of the full timeline, a selected clip or a range. There is no automatic TikTok preset, and that is exactly what makes the workflow verifiable.
- 01Check the timeline: the eye toggle in each track header must be on for every track that should be visible, and the speaker toggle for every track that should be audible.
- 02Choose the export scope: full timeline for the final upload, selected clip or range for a quick test.
- 03Set FPS to the frame rate of your source, 30 in this example.
- 04Pick a codec that current TikTok documentation accepts. A more efficient codec delivers more quality at the same bitrate; an older one maximises compatibility.
- 05Set the bitrate, around 6 Mbps in this example, and compare the estimated file size in the export panel with your own calculation. If it is far off, recheck FPS and export scope.
- 06Save the export to Photos or Files and review the saved file, not only the preview.
Run a range test before the full export
First export only ten seconds as a range, and pick the hardest passage: motion, small text, fine edges. Play the saved file full-screen on a phone. If text edges shimmer, raise the bitrate one step, from 6.2 to roughly 9 Mbps in this example. If motion breaks into blocks, do the same. If the file is much larger than expected, check FPS first, because an accidental 60 fps export doubles the video data. Only when the range looks clean do you export the full timeline.
Common failure modes and their causes
- A text layer is missing from the export: the eye toggle in the text track header was off. What is hidden in the preview stays hidden in the export.
- Music is missing or an audio track plays twice: check the speaker toggles of all audio tracks before you start the export.
- Motion looks juddery: the export FPS does not match the recording. Set it back to the source rate.
- Blockiness during pans: the bitrate is too low for the content. Go one step higher, then repeat the range test.
- The file is twice the calculated size: FPS is usually set to 60 while the source delivers 30.
- The upload looks worse than your file: TikTok re-transcoded it. Compare fairly, saved file against saved file, not file against stream.
Avoid double compression and keep a master
Every additional compression stage costs detail. Do not send the export through a messenger that recompresses it before it reaches TikTok. Upload the original FreeCut file directly and keep an untouched master in Files. If requirements change or you need the edit elsewhere, you export again from the project or fall back to the master.
Platform requirements keep moving
Aspect ratio, length and accepted codecs are documented by TikTok itself, and those requirements can change. For a casual post, a look at the current upload interface is enough. For campaigns or client deliveries, check the official specification for the exact placement and record the review date. This article was reviewed on 20 July 2026 and is not permanent platform policy.
- Source frame rate identified and set as the export FPS.
- Bitrate estimated with the bpp formula and compared with the file-size readout in the export panel.
- Eye and speaker toggles checked in every track header.
- Ten-second range exported and reviewed full-screen on a phone.
- Full timeline exported, master saved to Files, original uploaded directly.
- Current TikTok documentation cross-checked for the placement.
Sources and review basis
Product version: FreeCut 1.3Reviewed on 2026-07-20
About the editorial team
The FreeCut editorial team is part of LKS E-Commerce GmbH in Wuppertal — the same team that builds FreeCut. Every guide is reproduced in the app, product claims are limited to the public App Store listing, and every page carries a review date.
Keep reading
Shorts, Reels and TikTok: One Master, Three Current Checks
Build one clean vertical master in FreeCut, then adapt it for Shorts, Reels and TikTok: concrete steps, calculated file sizes and fixes for common failures.
Instagram Reels Export: A Placement-Aware Review Process
Concrete Reels export walkthrough in FreeCut 1.3: FPS, bitrate, codec, calculated file sizes, a range test and common failure fixes, without preset myths.
How to Verify a Video Editor Without a Forced Watermark
Verify that FreeCut 1.3 exports without a forced watermark: a ten-minute test with timeline setup, export panel steps and calculated file-size checks.
Cut your next video in FreeCut.
Export the selected scope without a forced FreeCut watermark, then inspect the saved file before publishing.