
Export · Reels
Instagram Reels Export: A Placement-Aware Review Process
Concrete Reels export walkthrough in FreeCut 1.3: FPS, bitrate, codec, calculated file sizes, a range test and common failure fixes, without preset myths.
An Instagram Reel is a video file with measurable properties and a placement inside an interface Meta keeps changing. A technically valid file can still fail because the title sits under the username overlay, or because fast motion turns into blocks after the platform re-encodes the upload. This guide walks through one concrete Reels export in FreeCut 1.3, using only what the public App Store listing documents: the multi-track timeline, styled text, the export panel with FPS, bitrate, codec and estimated file size, and the scope choice between full timeline, selected clip and range. There is no automatic Reels preset, and no setting here is claimed to stay correct forever.
Start with what your source actually is
Most Reels problems are decided before the export panel opens. A typical iPhone clip is recorded vertically at 1080x1920 or in 4K, at 30 or 60 frames per second. Resolution and frame rate are your anchors. Exporting a 30 fps recording at 60 fps creates no new information; it only doubles the data the encoder must spread its bitrate over. The worked example for this article: a 45 second vertical clip, recorded in 4K at 30 fps, planned as a 60 second Reel with a title and a music track.
Build the timeline for the placement
- 01Import the clip from Photos and place it on the video track of the timeline; bring the music from Files or the audio import onto its own audio track.
- 02Frame the picture in the preview with move, scale and rotation until the subject sits comfortably inside the vertical composition.
- 03Add a text element on the text track and style it with font, outline, background and shadow so it stays readable over bright and dark footage; size the text box so lines break where you want.
- 04Keep the title out of the zones Instagram covers with profile name, caption, audio row and action buttons; check the current Meta preview instead of trusting an old safe-area percentage.
- 05Use the eye toggle in a track header to hide a layer and judge the picture without it, and the speaker toggle to mute a track while balancing the audio.
The export panel, control by control
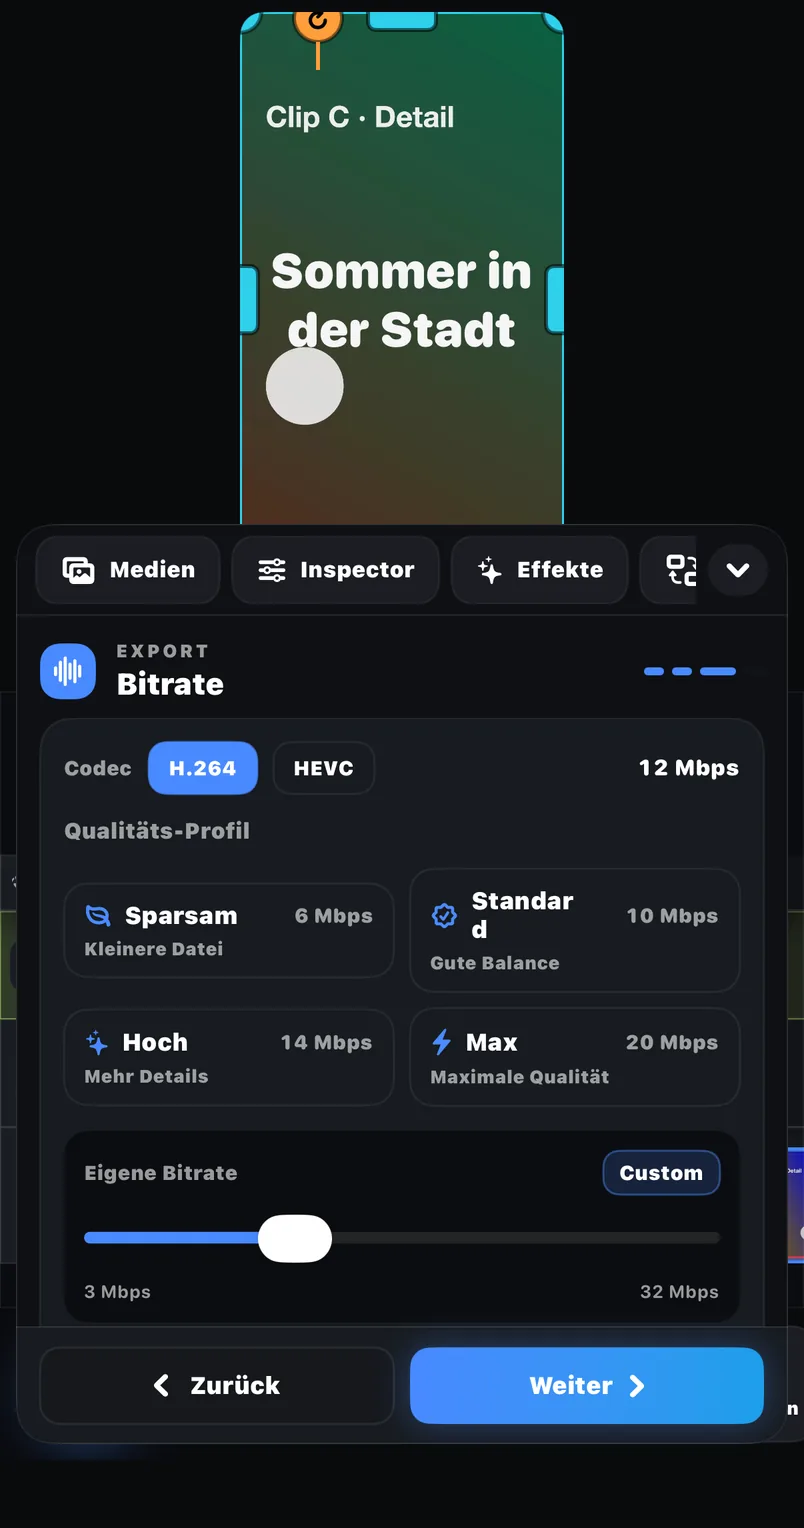
FreeCut 1.3 documents four export decisions plus a scope choice. None of them is a Reels guarantee; each is a visible tradeoff you can note and re-check.
| FPS | Follow the recording. A 30 fps source exports at 30 fps; pick 60 only for a true 60 fps clip. |
| Bitrate | The main quality lever. Watch the estimated file size readout update as you change it. |
| Codec | Choose one the current Meta specification accepts; when unsure, the most widely supported option. |
| Estimated file size | A sanity check before rendering: if it looks far off, question FPS and bitrate first. |
| Export scope | Full timeline for the final file; selected clip or range for tests. |
How bitrate becomes file size (calculated)
The numbers below are calculated, not measured tests. They follow two formulas: video bitrate = width x height x fps x bits per pixel, and file size = (video bitrate + 192 kbps audio) x duration / 8. Bits per pixel (bpp) is how much data the encoder spends per pixel: around 0.07 is economical, 0.10 solid, 0.15 generous for fast motion. All rows assume 1080x1920.
| 30 fps, 0.07 bpp | About 4.4 Mbps video; 60 s roughly 34 MB (calculated) |
| 30 fps, 0.10 bpp | About 6.2 Mbps video; 60 s roughly 48 MB (calculated) |
| 30 fps, 0.15 bpp | About 9.3 Mbps video; 60 s roughly 71 MB (calculated) |
| 60 fps, 0.10 bpp | About 12.4 Mbps video; 60 s roughly 95 MB (calculated) |
For the example 60 second Reel with moderate motion, 30 fps at roughly 6.2 Mbps is a good start: about 48 MB, quick to upload and generous enough for clean text edges. Fast camera movement earns the 0.15 bpp row. Instagram re-encodes uploads anyway, so extreme bitrates mostly buy upload time, not visible quality.
Run a range test before the full render
- 01In the export scope, pick range instead of full timeline and select ten to fifteen seconds containing your title, the fastest motion and a stretch of dialogue or music.
- 02Export with your candidate settings, in the example 1080x1920 at 30 fps and around 6 Mbps, and save the result to Photos.
- 03Play the saved file full screen on the phone. Check text edges, watch fast motion for blockiness, and listen for audio drifting against the picture.
- 04If lips and sound drift apart, fix it on the timeline; FreeCut's audio and video linking with the sync workflow exists to keep the two aligned while you edit.
- 05Only when the range looks right, switch the scope to full timeline and render the final file.
Common failures and their fixes
- The title sits under the Instagram interface: move it in the preview with the transform controls and re-check against the current placement preview instead of shrinking it until it is unreadable.
- Fast motion turns blocky: raise the bitrate one step, in the example from about 6.2 to about 9.3 Mbps, and repeat the range test.
- The estimated file size looks enormous: check FPS first; exporting a 30 fps source at 60 fps nearly doubles the calculated size.
- The exported file is much shorter than expected: the scope was still set to selected clip or range from an earlier test; switch it back to full timeline.
- Audio or a layer is missing: check the eye and speaker toggles in the track headers; a track hidden or muted for a quick check is easy to overlook.
Checklist before upload
- Current Meta placement guide read on the day of the upload.
- Export frame rate matches the recording.
- Bitrate chosen deliberately and checked against the estimated file size readout.
- Range test with text, motion and audio reviewed full screen.
- Export scope set to full timeline for the final render.
- Clean master saved to Files before the upload.
A good Reels export is not a secret preset; it is a short list of visible decisions you can re-check whenever the platform changes.
Sources and review basis
Product version: FreeCut 1.3Reviewed on 2026-07-20
About the editorial team
The FreeCut editorial team is part of LKS E-Commerce GmbH in Wuppertal — the same team that builds FreeCut. Every guide is reproduced in the app, product claims are limited to the public App Store listing, and every page carries a review date.
Keep reading
Shorts, Reels and TikTok: One Master, Three Current Checks
Build one clean vertical master in FreeCut, then adapt it for Shorts, Reels and TikTok: concrete steps, calculated file sizes and fixes for common failures.
A Source-First TikTok Export Checklist
A worked TikTok export example for FreeCut 1.3: source checks, a calculated bitrate and file-size table, and a step-by-step walk through the export panel.
How to Verify a Video Editor Without a Forced Watermark
Verify that FreeCut 1.3 exports without a forced watermark: a ten-minute test with timeline setup, export panel steps and calculated file-size checks.
Cut your next video in FreeCut.
Export the selected scope without a forced FreeCut watermark, then inspect the saved file before publishing.